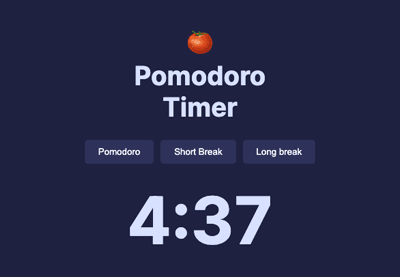

The Pomodoro technique is a widely used tool for increasing productivity. It does this by breaking work intervals into 25 minutes of focused work followed by short breaks. In this tutorial, we will create a Pomodoro tool that allows users to set a work interval timer. After the work session, a user can choose a 5 or 10 minute break.
Getting Started
Let’s start by creating the HTML structure for the Pomodoro timer. The timer will feature three buttons, namely:
- Pomodoro timer button
- Short break button
- Long break button
We will also have a display for each timer duration and control buttons for starting and stopping the timer.
HTML and CSS
The structure and styling of the timer are relatively straight-forward; suitable colors and layout, container elements with classes and IDs for targeting them properly. I’ll explain what they all are when we dive into the JavaScript, because that’s where the real learning happens in this tutorial!
JavaScript Functionality
As I mentioned, the most important aspect of this timer is the JavaScript functionality. Start by getting the IDs of all the timer button elements and assigning them to variables.
By defining these variables at the top of the file, we are essentially creating them as global variables. JavaScript global variables can be accessed inside functions, and this avoids having to redeclare them when we need them.
1 |
let pomodoro = document.getElementById("pomodoro-timer"); |
2 |
let short = document.getElementById("short-timer"); |
3 |
let long = document.getElementById("long-timer"); |
By default, when a user opens the Pomodoro timer application, we want to show them the 25 minute timer display; so let’s create a function called showDefaultTimer() that will only show the Pomodoro timer display and hide the other displays.
1 |
function showDefaultTimer() { |
2 |
pomodoro.style.display = "block"; |
3 |
short.style.display = "none"; |
4 |
long.style.display = "none"; |
5 |
}
|
6 |
|
7 |
showDefaultTimer() |
Here, we are using the CSS display property to change the visibility of the timer displays. The short and long display elements will be hidden, while the Pomodoro display will be visible. Finally, we call the showDefaultTimer() function to ensure that the functionality is applied to the elements when the HTML loads.
Event Listeners
Next, well create event listeners for listening to click events in each timer button. Begin by declaring a variable currentTimer and set its value to null. The currentTimer will designate the currently running timer.
1 |
let currentTimer =null; |
Next, create event listeners that will be triggered when a user clicks on the buttons.
1 |
document.getElementById("pomodoro-session").addEventListener("click", function(){ |
2 |
hideAll(); |
3 |
pomodoro.style.display = "block" |
4 |
currentTimer = pomodoro |
5 |
|
6 |
});
|
7 |
|
8 |
document.getElementById("short-break").addEventListener("click", function(){ |
9 |
hideAll(); |
10 |
short.style.display = "block" |
11 |
currentTimer =short |
12 |
|
13 |
|
14 |
});
|
15 |
document.getElementById("long-break").addEventListener("click", function(){ |
16 |
hideAll(); |
17 |
|
18 |
long.style.display = "block" |
19 |
currentTimer =long |
20 |
|
21 |
});
|
The event listeners will be fired when a user clicks the button timers. For example, when a user clicks the short break button, the user will see the 5:00 displayed, and the rest of the displays will be hidden. It will also set the value of currentTimer to the short break timer.
Hide the Timers
The hideAll() function will hide all the timers. Since all the timers are represented by the same class name, “timer-display,” we use document.querySelectorAll(".timer-display") to select and iterate through each element and set the style.property to none, making the elements invisible.
1 |
function hideAll(){ |
2 |
let timers = document.querySelectorAll(".timer-display"); |
3 |
timers.forEach(timer=> timer.style.display ="none") |
4 |
};
|
Start Timer Functionality
JavaScript provides the setInterval() function that allows us to call a function after a specified time. The setInterval() function repeats a function after a given period. The syntax looks like this:
1 |
setInterval(code, delay) |
For example, in our case, we want to decrement a timer by 1 second. Let’s create a startTimer() function that will take the duration of the currentTimer(), start a countdown, and update the display with the remaining time.
1 |
let myInterval = null; |
2 |
|
3 |
function startTimer(timerdisplay){ |
4 |
|
5 |
timerDuration = timerdisplay.getAttribute("data-duration").split(":")[0] |
6 |
let durationinMiliseconds = timerDuration*60*1000; |
7 |
let endTimestamp = Date.now() + durationinMiliseconds; |
8 |
|
9 |
}
|
Let’s break down what is happening here:
-
let myInterval = null;declares a variable and initializes it to a null value. - Inside the startTimer() ,
function:timerDuration = timerdisplay.getAttribute("data-duration").split(":")[0];– retrieves the duration of thecurrentTimer; for example, if the element’s duration is 25:00, the value extracted will be 25, -
let durationinMiliseconds = timerDuration*60*1000;– converts the timer duration to milliseconds -
let endTimestamp = Date.now() + durationinMiliseconds;– declares a variableendTimestamp, which is equal to the timestamp when the timer will end.
Create the Timer
Next, we will create our timer using the setInterval() method. Our setInterval() method will contain a function that will use the time remaining and run every 1 second (1000 milliseconds) until the remaining time runs out. We will also update our display with the remaining time each second. When the timer reaches 0, we will display 00:00 and play an alarm sound.
Update the startTimer () function like this:
1 |
function startTimer(timerdisplay) { |
2 |
if (myInterval) { |
3 |
clearInterval(myInterval); |
4 |
}
|
5 |
|
6 |
timerDuration = timerdisplay.getAttribute("data-duration").split(":")[0]; |
7 |
console.log(timerDuration); |
8 |
|
9 |
let durationinmiliseconds = timerDuration * 60 * 1000; |
10 |
let endTimestamp = Date.now() + durationinmiliseconds; |
11 |
|
12 |
|
13 |
myInterval = setInterval(function() { |
14 |
const timeRemaining = new Date(endTimestamp - Date.now()); |
15 |
|
16 |
|
17 |
|
18 |
if (timeRemaining <= 0) { |
19 |
|
20 |
clearInterval(myInterval); |
21 |
timerdisplay.textContent = "00:00"; |
22 |
const alarm = new Audio("https://www.freespecialeffects.co.uk/soundfx/scifi/electronic.wav"); |
23 |
alarm.play(); |
24 |
} else { |
25 |
const minutes = Math.floor(timeRemaining / 60000); |
26 |
const seconds = ((timeRemaining % 60000) / 1000).toFixed(0); |
27 |
const formattedTime = `${minutes}:${seconds.toString().padStart(2, '0')}`; |
28 |
console.log(formattedTime); |
29 |
timerdisplay.textContent = formattedTime; |
30 |
}
|
31 |
}, 1000); |
32 |
}
|
Inside the myInterval() function, we declare a variable timeRemaining that is equal to the time remaining after the timer starts. Then, we check if the timeRemaining is less than or equal to 0. If valid, we clear the timer with the clearInterval() function, which takes the interval id as an argument and clears the running timer. We also update the displayed time to 00:00 and play an audio alarm to inform the user that the timer has reached 0.
If the timeRemaining is greater than 0, we do the following.
-
const minutes = Math.floor(timeRemaining / 60000);: converts the remaining time to minutes -
const minutes = ((timeRemaining%60000) /1000).toFixed(0);: converts thetimeRemainingto seconds -
const formattedTime = `${minutes}:${seconds.toString().padStart(2, '0')}`;: formats the remaining time in the format “MM: SS” -
timerdisplay.textContent=formattedTime;: updates the text content of the timer display with the formatted time.
When the startTimer() is called, it updates the displayed time every second to create our timer countdown.
Start Button
For the timer to display a countdown , it needs to be executed inside the start click event listener. Add a click listener to the start button and execute the startTimer() function.
1 |
document.getElementById("start").addEventListener("click", function () { |
2 |
if(currentTimer){ |
3 |
startTimer(currentTimer); |
4 |
}
|
5 |
});
|
The event listener above will be triggered when the start button is clicked, and it will call the startTimer() function, which will start the countdown based on the duration passed as the argument.
Fixing Flaws
Our timer is working, but it still has a flaw; when you start a new timer before the previous one has ended, the previous one will still be running. To solve this flaw, we first need to check for an existing timer before starting a new one. Inside the startTimer() function, add an if statement that checks if there is an existing timer; if it exists, clear the timer.
1 |
function startTimer(timerdisplay){ |
2 |
if (myInterval) { |
3 |
clearInterval(myInterval); |
4 |
}
|
5 |
// the rest of the code here
|
6 |
|
7 |
}
|
To stop the timer when the sop button is clicked, , we call the clearInterval() function with our Interval id.
1 |
document.getElementById("pause").addEventListener("click", function () { |
2 |
if(currentTimer){ |
3 |
clearInterval(myInterval); |
4 |
}
|
5 |
});
|
Our Finished Pomodoro Timer!
We’re done! See the Pomodoro Timer in action.
Conclusion
This tutorial has covered how to create a basic Pomodoro timer. You should now be able to create your own Pomodoro Timer with more added functionality. Why not take it a step further and enhance the UI? Share your results with us!


Recent Comments